

Scandinavian weather is notoriously unpredictable, with rain often sweeping in from the Atlantic, turning serene forests into soggy challenges. In Sweden, Norway, and Denmark, where annual rainfall can exceed 1,000 mm in coastal areas, hammock camping demands preparation to avoid discomfort. Yet, many enthusiasts swear by hammocks over tents in wet conditions: they elevate you above pooling water, reduce condensation buildup, and allow for better airflow. At Jord Hammock, our gear—crafted from durable, water-resistant materials—is designed specifically for these Nordic downpours, helping you stay dry while embracing the rhythmic sound of rain on your tarp.
This comprehensive guide expands on essential strategies for hammock camping in the rain, drawing from community insights, expert advice, and real-world experiences. We’ll cover everything from gear selection to advanced setup techniques, ensuring your adventures in places like Hälsingland’s misty woods or the fjords remain comfortable and safe. Whether you’re a beginner or seasoned hanger, these tips will help you master rainy nights without the hassle of flooded tents.
Why Choose Hammock Camping in the Rain? The Advantages Over Traditional Tents
Hammock camping shines in wet weather for several reasons rooted in physics and practicality. Unlike tents, which sit directly on the ground and can trap moisture from below, hammocks suspend you in the air, eliminating contact with puddles or damp soil. This reduces the risk of water seeping in and minimizes internal condensation, a common issue in humid Scandinavian climates where fog and drizzle persist.
Experienced campers note that hammocks allow for cooking and lounging under your tarp without getting wet, providing a “porch mode” for activities during storms. In heavy rain, tents often develop a musty odor from trapped humidity, but hammocks promote better ventilation, keeping gear fresher. Research from outdoor communities highlights that with proper insulation, hammocks can even feel warmer in cold, rainy conditions by avoiding ground chill. Plus, in Scandinavia’s tree-dense landscapes, finding suitable hang spots is easier than flat tent sites, aligning with Allemansrätten principles of low-impact camping.
However, success hinges on addressing key challenges: wind-driven rain, drips along suspension lines, and maintaining dry insulation. Neglecting these can lead to a miserable night, but with the right approach, rainy hammocking becomes a cozy retreat.
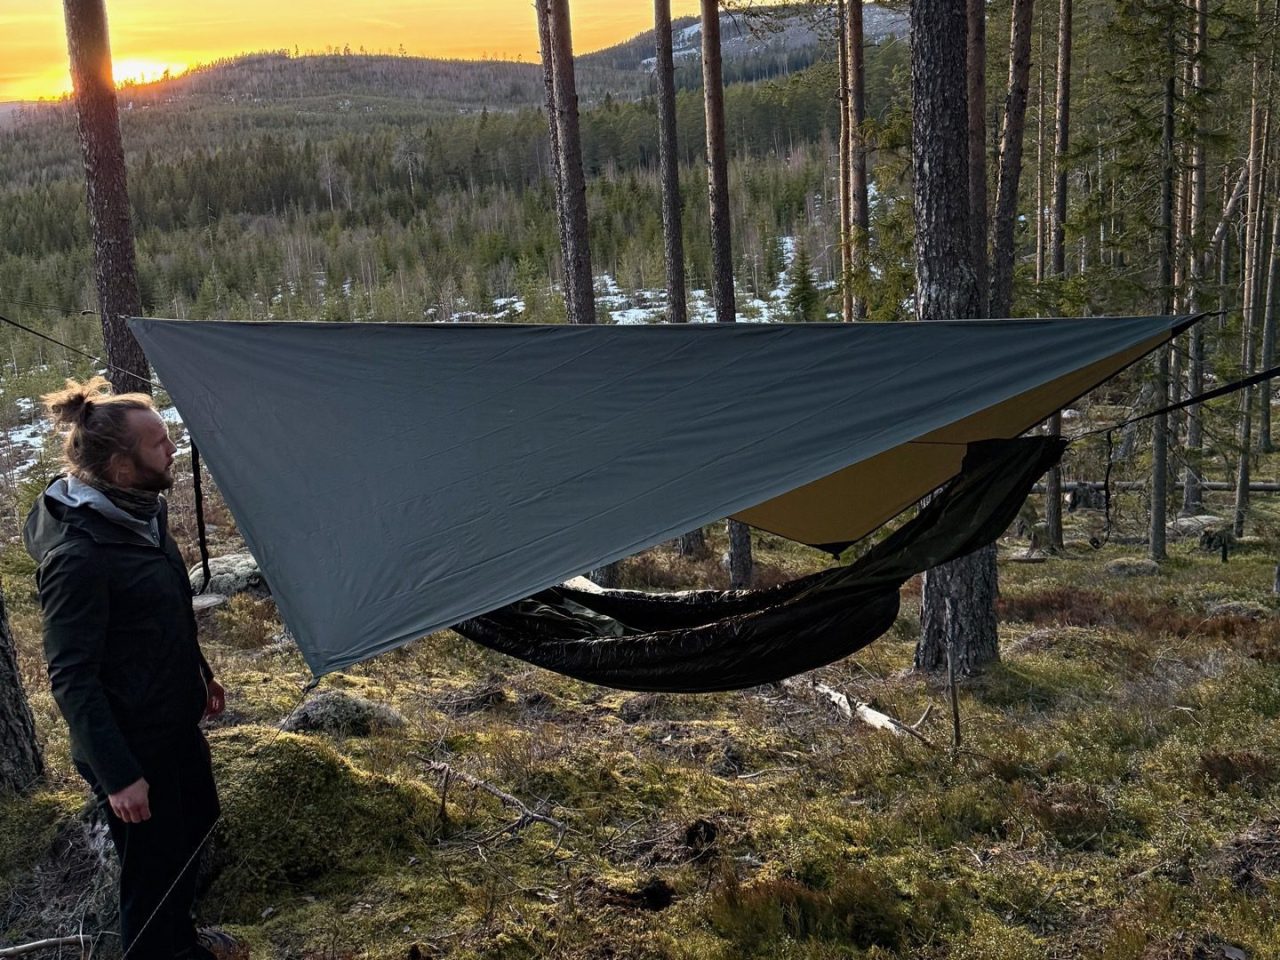
Essential Gear for Rainy Hammock Camping: Building a Waterproof System
Gear is your first line of defense against Scandinavian showers. Focus on high-quality, lightweight items that prioritize waterproofing and quick-drying properties. Here’s a detailed breakdown:
1. The Hammock: Quick-Drying and Stable
Choose a hammock made from ripstop nylon or similar hydrophobic fabrics that shed water easily. Avoid cotton blends, which absorb moisture and take ages to dry. For stability in gusty rains, an asymmetrical design prevents twisting.
Our Jord Hammock, handmade in Sweden and up to 350 cm long, features integrated storage pockets for keeping essentials dry and an optional bug net (removable for rainy seasons to save weight). Its quick-drying material ensures it’s ready for packing even after a downpour.
2. Tarp: Your Primary Shelter
A large, versatile tarp is non-negotiable. Opt for one with at least 3×4 meters of coverage, preferably with doors or panels to block sideways rain common in Nordic winds. Silnylon or polyurethane-coated fabrics provide excellent waterproofing with a hydrostatic head rating of 3000 mm or higher.
The Jord Tarp offers expansive protection, with reinforced tie-outs for secure pitching in storms. For extreme conditions, consider a hex-shaped tarp for better wind resistance.
3. Insulation: Keeping Warm and Dry
Rain often brings colder temperatures, so insulation must resist moisture. Use down or synthetic underquilts and top quilts rated for wet conditions—synthetics like Climashield Apex dry faster if they get damp.
Pair our Jord Underquilt with the Jord Topquilt, both featuring RDS-certified down treated for water resistance. Add an underquilt protector (a lightweight waterproof shell) to shield against splashes.
4. Suspension and Accessories
Tree straps should be wide (at least 1 inch) to protect bark and include drip-prevention features. Paracord or Amsteel lines work well, but add drip strings or lines to divert water.
Essential extras: A continuous ridgeline for tarp stability, dry bags for clothing, and a hot water bottle for warmth. Rain gear like a poncho doubles as a ground cloth during setup.
Investing in a cohesive system like Jord Hammock’s lineup ensures compatibility and reliability, tested in Sweden’s variable weather.
Site Selection: Finding the Perfect Spot in Wet Weather
Before pitching, scout wisely. In Scandinavia, seek sheltered areas in dense forests to buffer wind and rain—avoid open ridges or valleys that funnel water. Look for slightly elevated ground to prevent runoff pooling beneath you.
Check for healthy trees 4-6 meters apart, at least 20 cm in diameter, and free of dead branches (widowmakers) that could fall in storms. In rainy conditions, position your setup with the tarp’s long side facing prevailing winds for optimal deflection. Use apps like Windy or local forecasts to predict wind direction.
Pro tip: If the ground is saturated, hang your hammock higher (18-24 inches off the ground) to avoid splashback from heavy rain.
Advanced Tarp Setup Techniques for Maximum Protection
Your tarp setup can make or break a rainy night. Always deploy the tarp first in precipitation—keep it accessible on the outside of your pack for quick access.
- Continuous Ridgeline (CRL) Method: Run a dedicated ridgeline above or below the tarp using paracord. For rain, position the tarp below the CRL to prevent water channeling underneath. Tension it taut for sag-free coverage.
- Storm Mode Pitching: Lower the tarp edges close to the ground (6-12 inches above the hammock) and stake out tightly. Use doors or flaps to enclose the setup, creating a cocoon against horizontal rain.
- A-Frame vs. Diamond Pitch: For versatility, start with an A-frame for broad coverage, then adjust to diamond for windier spots. Ensure the ridgeline is centered over your hammock to avoid exposure.
Practice these in dry conditions to shave setup time to under 5 minutes.
Drip Prevention: Stopping Water from Infiltrating Your Setup
Water traveling along suspension lines is a sneaky culprit for wet hammocks. Implement multiple barriers:
- Drip Lines or Strings: Tie short (6-12 inch) pieces of paracord or string to your tree straps or suspension, just inside the tarp edge. Let them dangle to break water flow—gravity pulls droplets off before they reach your hammock.
- Twisting Straps: Add 2-3 twists to tree straps to disrupt water paths.
- Becket Hitch or Soft Connections: Use knot-based attachments instead of metal hardware, as water tends to bypass carabiners less effectively.
These simple hacks, popularized in hammock communities, can keep your sleeping area bone-dry even in torrential rain.
Managing Insulation and Warmth in Wet, Chilly Conditions
Rain often coincides with drops in temperature, amplifying hypothermia risks. Layer your insulation: Underquilt below for bottom warmth, top quilt above to trap body heat. Use breathable materials to vent moisture from sweat or condensation.
In cold rain (below 10°C, common in Nordic falls), add a vapor barrier liner inside your quilts to block external humidity. Fill a hot water bottle before bed for initial warmth. Always reserve dry sleep clothes—change under the tarp to maintain core temperature.
Pack and Gear Storage: Keeping Everything Organized and Dry
Hang your backpack from the ridgeline or hammock ends under the tarp, using a carabiner for easy access. For extra protection, line it with a trash bag or dry sack. Wet clothes? Suspend them from the opposite end to drip-dry without soaking your space.
In prolonged rain, repack non-essentials into waterproof bags and focus on ventilation during breaks to prevent mold.
Common Mistakes and How to Avoid Them
- Undersized Tarp: Skimping on size leads to exposure—always go bigger.
- Ignoring Wind Direction: Pitching against the wind causes flapping and leaks—check forecasts.
- Overlooking Condensation: Ventilate by cracking tarp edges slightly.
- Wet Setup Order: Never unpack insulation before the tarp is up.
- Poor Tensioning: Saggy tarps pool water—stake firmly.
Learn from these to turn potential pitfalls into seamless experiences.
For more community-driven advice, visit this insightful thread on HammockForums.net. Explore general outdoor tips from Friluftsfrämjandet. For gear insights, check REI’s hammock guide. Additional strategies can be found in this Reddit discussion. And for product-specific tips, see DutchWare’s rain guide.
Conclusion: Embrace the Rain with Confidence
Hammock camping in the rain transforms a potential ordeal into a meditative escape, especially in Scandinavia’s lush, watery landscapes. By prioritizing robust gear, smart setups, and preventive measures, you’ll stay dry, warm, and immersed in nature.
Ready to tackle your next rainy adventure? Stock up on Jord Hammock’s proven, Swedish-made equipment at jordhammock.com and discover the joy of hanging through the storm. With these strategies, every shower becomes an opportunity for serenity.
